1. GestureDetector 위젯
개요
GestureDetector는 사용자가 화면에서 수행하는 다양한 터치 이벤트를 감지하고 처리하는 기본적인 Flutter 위젯입니다.
특징
- GestureDetector 자체는 화면에 표시되지 않으며, child에 지정된 위젯에 사용자 이벤트가 발생할 때 이벤트를 처리할 수 있습니다
- 다양한 사용자 이벤트에 대한 콜백 함수들로 구성되어 있어, 각 이벤트에 맞는 동작을 정의할 수 있습니다
주요 콜백 함수
| 콜백 함수 | 설명 | 사용 예시 |
| onTap | 사용자가 화면을 가볍게 탭할 때 호출 | 버튼 클릭 효과 |
| onDoubleTap | 사용자가 화면을 빠르게 두 번 탭할 때 호출 | 이미지 확대 |
| onLongPress | 사용자가 화면을 오래 누르고 있을 때 호출 | 아이템 삭제 옵션 표시 |
| onTapDown | 사용자가 화면을 터치하기 시작할 때 호출 | 버튼을 누르는 즉시 효과 적용 |
| onTapUp | 사용자가 터치한 손가락을 화면에서 떼었을 때 호출 | 클릭 완료 |
| onVerticalDragStart | 사용자가 화면을 위아래로 드래그하기 시작할 때 호출 | 목록 스크롤 시작 감지 |
| onHorizontalDragStart | 사용자가 화면을 좌우로 드래그하기 시작할 때 호출 | 슬라이드 메뉴 호출 |
import 'package:flutter/material.dart';

void main() {
  runApp(MyApp());
}

class MyApp extends StatelessWidget {
  @override
  Widget build(BuildContext context) {
    return MaterialApp(
      home: Scaffold(
        appBar: AppBar(
          title: Text('GestureDetector 사용해보기'),
        ),
        body: GestureDetector(
          // 화면을 탭할 때 호출되는 콜백 함수
          onTap: () {
            print('Screen tapped');
          },
          // 화면을 두 번 탭할 때 호출되는 콜백 함수
          onDoubleTap: () {
            print('Screen double-tapped');
          },
          // 화면을 오래 누를 때 호출되는 콜백 함수
          onLongPress: () {
            print('Screen long-pressed');
          },
          child: Center(
            child: Container(
              width: 200,
              height: 200,
              color: Colors.blueAccent,
              alignment: Alignment.center,
              child: Text(
                'Tap, Double Tap or Long Press',
                textAlign: TextAlign.center,
                style: TextStyle(color: Colors.white),
              ),
            ),
          ),
        ),
      ),
    );
  }
}
import 'package:flutter/material.dart';
void main() {
runApp(const MyApp());
}
class MyApp extends StatelessWidget {
const MyApp({super.key});
@override
Widget build(BuildContext context) {
return MaterialApp(
debugShowCheckedModeBanner: false,
home: Scaffold(
appBar: AppBar(title: Text('드래그 기능 만들어 보기')),
body: DraggableBox(),
),
);
}
}
class DraggableBox extends StatefulWidget {
const DraggableBox({super.key});
@override
State<DraggableBox> createState() => _DraggableBoxState();
}
class _DraggableBoxState extends State<DraggableBox> {
double _xOffset = 0.0; // x축 이동 값
double _yOffset = 0.0; // y축 이동 값
@override
Widget build(BuildContext context) {
return GestureDetector(
// 드래그가 업데이트 될 때 호출되는 콜백
onPanUpdate: (details) {
print('details 1 : ${details.runtimeType}');
print('details 2 : ${details.toString()}');
setState(() {
_xOffset += details.delta.dx;
_yOffset += details.delta.dy;
});
},
child: Stack(
children: [
Positioned(
left: _xOffset,
top: _yOffset,
child: Container(
color: Colors.redAccent,
width: 150,
height: 150,
child: Text('드래그 해보세요!'),
),
)
],
),
);
}
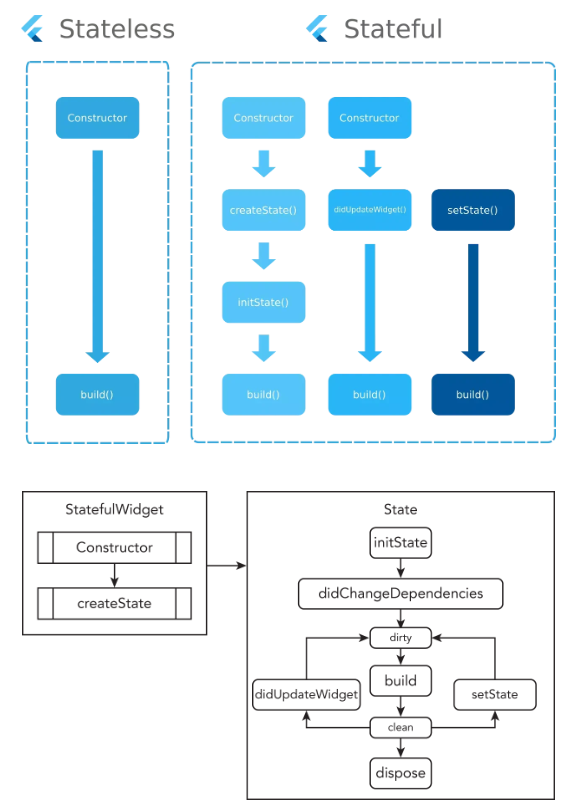
}Flutter에서의 위젯 생명 주기
Flutter에서 위젯의 생명 주기는 중요한 개념입니다. 특히, StatelessWidget과 StatefulWidget은 동작 방식이 다르기 때문에 각각의 생명 주기를 이해하는 것이 중요합니다.
애니메이션을 사용한 생명주기 확인 하기
import 'dart:math';

import 'package:flutter/material.dart';

void main() {
  runApp(
    MaterialApp(
      debugShowCheckedModeBanner: false,
      home: Scaffold(
        body: MyWidget(),
      ),
    ),
  );
}

class MyWidget extends StatefulWidget {
  const MyWidget({super.key});

  @override
  State<MyWidget> createState() => _MyWidgetState();
}

// SingleTickerProviderStateMixin -> 애니메이션을 적절히 컨트롤 하는 녀석
class _MyWidgetState extends State<MyWidget>
    with SingleTickerProviderStateMixin {
  late AnimationController _controller;
  late Animation _animation;
  int _count = 0;
  Color _background = Colors.blue;

  @override
  void initState() {
    super.initState();
    _controller = AnimationController(
      // vsync는 화면 새로고침 주기에 동기화하여 애니메이션 성능을 최적화 합니다.
      vsync: this,
      // 애니메이션에 지속 시간을 설정합니다.
      duration: Duration(milliseconds: 500),
    );

    _animation = Tween<double>(begin: 0.5, end: 2.0)
        .animate(CurvedAnimation(parent: _controller, curve: Curves.easeIn))
      ..addListener(() {
        setState(() {
          // 애니메이션을 진행할 때 마다 화면을 업데이트 합니다.
        });
      });
    // Curves.easeIn --> 부드럽게 시작 천천히 시작해서 빠르게 끝나는 처리
  }

  @override
  Widget build(BuildContext context) {
    return SafeArea(
      child: Center(
        child: Column(
          children: [
            Text(
              '버튼을 누르는 횟수 : $_count',
              style: TextStyle(fontSize: 20),
            ),
            SizedBox(height: 20),
            Transform.scale(
              scale: _animation.value,
              child: ElevatedButton(
                style: ElevatedButton.styleFrom(
                  padding: EdgeInsets.symmetric(horizontal: 24, vertical: 12),
                  backgroundColor: _background,
                ),
                onPressed: _incrementCounter,
                child: Text(
                  '눌러보기',
                  style: TextStyle(fontSize: 20),
                ),
              ),
            )
          ],
        ),
      ),
    );
  }

  void _incrementCounter() {
    setState(() {
      _count++;
      _background = _colorRandom();
    });
    // 애니메이션을 앞으로 진행한 후, 완료되면 다시 원 상태로 처리
    _controller.forward().then(
      (value) {
        _controller.reverse();
      },
    );
  }

  // 추가로 랜덤한 색상을 뽑아내는 함수를 만들어서 적용 !!
  Color _colorRandom() {
    final random = Random();
    return Color.fromARGB(
      255,
      random.nextInt(255),
      random.nextInt(255),
      random.nextInt(255),
    );
  }

  @override
  void dispose() {
    _controller.dispose(); // 자원 해제
    super.dispose();
  }
}
'Flutter' 카테고리의 다른 글
| Flutter Key 및 상태 관리의 기본 개념 - Flutter의 Element 재사용 메커니즘 (0) | 2025.08.19 |
|---|---|
| Flutter Key 및 상태 관리의 기본 개념 - Flutter의 세 가지 트리 구조 (0) | 2025.08.19 |
| dart HTTP 요청과 응답 처리 및 파싱 (0) | 2025.08.19 |
| dart 비동기 프로그래밍 (0) | 2025.08.19 |
| 콜백 함수의 이해 (0) | 2025.08.19 |